

I first paint the head, torso, and arms with a flesh colored paint. You need to paint 3 coats and wait at least an hour between each coat of paint. I paint my creations on an old plastic cutting board. If you paint on paper, the paint will stick to the paper and it is difficult to remove all the paper fragments.


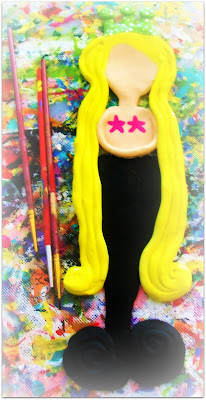 I think the black tail looks striking against the yellow hair, green crown, and hot pink starfish. This mermaid is beginning to look like Stevie Nicks.

I added some polka dots of different sizes to complement the striped tail.


I painted the tail a glossy white with the intent of painting a zebra patterned tail. This is my first attempt to paint a zebra patterned tail.

I have used several different shades of yellow to give the hair more depth. I like using green with yellow. I like giving the mermaid a nontraditional looking crown to go along with her funky tail.
I usually paint starfish on the chest and it is fairly easy to do. You do not have to worry about being perfect. The little bumps and imperfections can add charm to the final product.
I tried painting black stripes on the tail, but it looks horrible. I decided to paint it black with white stripes instead.
I tried painting black stripes on the tail, but it looks horrible. I decided to paint it black with white stripes instead.


I added some polka dots of different sizes to complement the striped tail.

I dip the tip of my paintbrush to make the eyes and cheeks. You need to blot it once and practice on a piece of paper before you apply the paintbrush to the face. I use a paintbrush with fine bristles to paint a smile.
I painted a variety of stripes to mimic a zebra pattern for this posh mermaid. This is my first "wild" mermaid and I really like her.
I added a coat of glitter glue to the crown.
This mermaid would look enchanting in a shadowbox with a pretty piece of scrapbook paper behind her.
Note: It is best to either glue a clay creation onto a shadowbox or hang it on a wall (I just twist jewelry wire, press it into a flat rectangle of clay, and glue it onto the back of the mermaid). This clay is fragile and it will break if you drop it.
Please e-mail me or leave a comment if you have any questions or suggestions.
Thank you for stopping by ViBella Creations!
Cheri
Cheri
No comments:
Post a Comment