Monday, July 18, 2011

How to Make a Clay Mermaid Tutorial Part Three

Now we have reached the painting stage.  This is the fun part.  Painting is like breathing life into your clay creation.  I like to experiment and try different techniques and colors.  I use acrylic paint and I buy a variety pack of paint brushes.  Sometimes you will need brushes with fine tips to neatly paint around the edges.  I use medium width bristles for wider areas.

I first paint the head, torso, and arms with a flesh colored paint.  You need to paint 3 coats and wait at least an hour between each coat of paint.  I paint my creations on an old plastic cutting board.  If you paint on paper, the paint will stick to the paper and it is difficult to remove all the paper fragments.


I painted the tail a glossy white with the intent of painting a zebra patterned tail. This is my first attempt to paint a zebra patterned tail. 


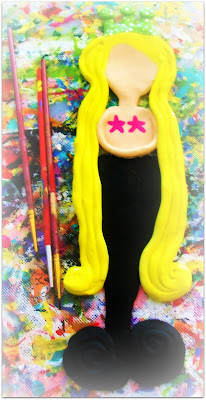
I have used several different shades of yellow to give the hair more depth.  I like using green with yellow.  I like giving the mermaid a nontraditional looking crown to go along with her funky tail.

I usually paint starfish on the chest and it is fairly easy to do.  You do not have to worry about being perfect.  The little bumps and imperfections can add charm to the final product.

I tried painting black stripes on the tail, but it looks horrible.  I decided to paint it black with white stripes instead.


I think the black tail looks striking against the yellow hair, green crown, and hot pink starfish.  This mermaid is beginning to look like Stevie Nicks.


I added some polka dots of different sizes to complement the striped tail.


I dip the tip of my paintbrush to make the eyes and cheeks.  You need to blot it once and practice on a piece of paper before you apply the paintbrush to the face.  I use a paintbrush with fine bristles to paint a smile.

I painted a variety of stripes to mimic a zebra pattern for this posh mermaid.  This is my first "wild" mermaid and I really like her.  

I added a coat of glitter glue to the crown.

This mermaid would look enchanting in a shadowbox with a pretty piece of scrapbook paper behind her.  

Note:  It is best to either glue a clay creation onto a shadowbox or hang it on a wall (I just twist jewelry wire, press it into a flat rectangle of clay, and glue it onto the back of the mermaid). This clay is fragile and it will break if you drop it.


Please e-mail me or leave a comment if you have any questions or suggestions.  

Thank you for stopping by ViBella Creations!

Cheri

Thursday, July 14, 2011

How to Make a Clay Mermaid Tutorial Part Two

Apart from the tail, the hair and crown show cases the mermaid and gives her a romantic touch.


Roll six long strands of hair.  Place three strands on each side of her head.  You will need to trim the edges by using the smooth side of a butter knife.  I like the hair to cascade down right above the fins.

Next you want to style your mermaid's hair.  Gently push the strands together and create gentle waves in the hair.  This type of hair is the easiest type to paint.  I also make wild curls and braids, but they are tedious to paint.


Crowns are easy to make.  Just make a square and form 3 triangles.


Lastly, roll 3 small balls of clay and press each ball into each crown point.


On my next post, I will share my painting techniques and tools.

Thank you for stopping by ViBella Inspirations!

Cheri


Tuesday, July 12, 2011

How to Make a Clay Mermaid Tutorial Part One


It is fun and fairly simple to take a humble lump of clay and transform it into a dazzling creature like a mermaid.  You do not have to be Michelango to create a mermaid.  I have broken down the process into easy to follow step and photos.


I use Sculpey clay.  You can purchase it for approximately $15 at any craft store.  You need to preheat your oven to 275 degrees and bake it for about 10 minutes.  Let it cool and gently slide a metal spatula under the mermaid to remove it from the cookie sheet.


I roll the clay into a ball for the head. You then smash it flat on an Airbake baking sheet.


Roll a small ball of clay and make it look like a snake.  Press the neck into the head.  You will need to constantly smooth out lumps.


Make a rectangular shape and press it into the neck.  Gently round the corners to create shoulder and narrow it down into a waist.


 You can make a heart shape for the tail and then roll two extra "snakes" for the fins.  I like to coil the "snakes" into the fins for a graceful effect.

 Next form 2 extra snakes for arms and press it into the shoulder area.


 Please stay tuned.  In a few days I will post instructions on how to form hair and a crown.

Thank you for stopping by ViBella Inspirations!

Cheri


Friday, July 8, 2011

How to Decorate a Shadow Box


I bought a shadow box for the first time at Hobby Lobby.  I bought some American Girl scrap book paper and just had so much fun creating a shadow box with my daughter's photo.


Step One:  I first cut the scrapbook paper for the background and pasted it with scrapbook paper friendly glue.  You really need a paper cutter or an Exacto knife in order for the paper to fit inside the shadow box.

I should have painted the box first and then put the scrapbook paper inside; however, I had originally planned on  gluing scrapbook paper on the entire frame.


Step two:  I printed out a photo and glued it a little off center for visual interest.


Step three:  I glued an orange American Girl photo insert over her photo.


Step four: I glued several phrases and images that reminded me of my daughter.  I have hung this in her yellow bathroom and it looks very cheerful.

Happy crafting!


Thank you for stopping by ViBella Inspirations!!!

Cheri

Wednesday, July 6, 2011

Paper Paint Blot Tutorial

My 6-year-old, Isabella,  and I just made paint blots for the first time and had so much fun making butterflies, hearts, and robots.  This is a simple but very fun craft to do together.

Here are the instructions:


  • First, just fold a piece of paper in half. 
  • Paint half of your image on one side of the paper.
  • Close the paper, press and firmly rub the painting to make a good impression.
  • Open it carefully to reveal your new paint blot.


Here is my simple heart paint blot:


Happy painting and creating fun memories together!

Cheri

Tuesday, July 5, 2011

How to Welcome Your Child Home After Camp, Staying with Grandparents, etc.

My daughter recently spent 5 days away from home.  She stayed with her Grandpa and made so many wonderful memories with him and other family members who live nearby.

I wanted to give her a cheery welcome home so I made a few signs from Smile Box.  I taped one sign onto her bathroom mirror. I taped a welcome home sign on the front door and tied some pink balloons beside the door. I heard her squeal with delight when she and my dad pulled up in the driveway.

I placed the Dove chocolate bar and La La Loopsy doll on her bed.  She was really excited to see her signs and little gifts.  She enjoyed finding little surprises throughout her home.

Here's to making fun memories with your child.

Thank you for visiting ViBella Inspirations!

Cheri

P.S.  Here are some of the photos of the signs and small gifts.


Monday, July 4, 2011

How to Love the Unlovables

I heard an incredible sermon on how to tolerate the unlovable people in your life.  The preacher said that people's flaws are actually scars.  Wouldn't it be easier to tolerate someone if you understood the whole history and life story of that annoying and rude co-worker or neighbor?  Would your heart soften if you know that abrasive co-worker got beaten every night or lived in numerous foster homes?

Let's try to remember there is a reason why Mr. or Mrs. Dysfunctional is that way and show him or her mercy.  You might even end up liking him or her or even changing their lives.

It's the times in my life where I showed kindness to someone that make me the most proud and give me the most peace.

Thank you for stopping by ViBella Inspirations!

Cheri

Friday, July 1, 2011

My Review for Something Blue by Emily Giffin

I picked up this book with hesitation.  I thought it would be a little too trite for my taste, but I actually ended up liking it.  The main character, Darcy, is vain and superficial and makes horrible decisions.   She is very unlikable at first.

Darcy is your typical Alpha female with a loyal plain best friend named Rachel.  Darcy never lets Rachel (or anyone else) shine in the lime light.  Darcy is carelessly engaged for 7 years and cheats on her fiance a few times during their engagement.  Rachel ends up with Darcy's fiance while Darcy has gotten pregnant by her fiance's sleazy friend.

Through an unlikely source, she learns some tough life lessons and receives tough love.  Sometimes salvation clops in a non glamorous package.

This is a good summer read type of book.  I would definitely recommend this book if you're looking for a light read. 

Thank you for stopping by ViBella Inspirations!  Happy reading!!

Cheri